The INOH Client
User’s Operational Manual
The INOH System is designed through the adoption of the client-server-based Web services, being divided into the server's software and the client's software which is designed to access the server's one.
This manual gives a description of how to use the client's software, the INOH Client.
The INOH Client is the client software for retrieving diagram data from a signaling pathway database system and editing them.
The screen of the INOH Client
You can search a database for diagram data, download and read the data into your local machines with this software.
The read diagram data can be displayed on the graphical user interface screen, and then be easily edited with intuitive operations.
The resultant data may be recorded as files in your local machine (the local files).
The INOH Client can easily edit signaling pathway diagrams using the Graphical User Interface (GUI) with a mouse.
Main functions of the Diagram editing are listed below.
- Creating nodes
- Creating edges
- Creating compound nodes (Grouping) and canceling the compound nodes (De-grouping)
- Cutting, Copying, Pasting, and Deleting the above objects (nodes and/or edges)
- Moving the above objects with a mouse
- Editing the properties of the above objects using the Property Panel
- Scaling the view of the diagram
- Reduced view of the diagram
- Storing and reading the diagram data
-
Editing concurrently two or more diagrams with the tab-based multi document interface
Main functions of the Search capability are listed below.
- Keyword searches
- Pathway retrieval
- Search by INOH Ontology viwer
- Search external DBs
Java 6(JDK 1.6.0) or later and the system on which the Java's GUI program can operate are required.
The implementation of 256 MB or more of Memory is recommended.
The software was checked on Windows XP SP2, Red Hat Linux and Mac OS X + Java 6. No tests on other platforms.
- On Mac OS X, you can't use "Select all" of Edit menu.
- On Mac OS X, you can't use "Change node type" and "Change edge type" of Object menu. Please use "Change node type" and "Change edge type" of Toolbar or Pop-up Menu(mouse click with pressing Ctrl key).
- On Mac OS X 10.5(Leopard), "Find", "Keyword/ID search", "Similarity search", "Pathway retrieval" of Search menu can't work properly when you invoke INOH client by double clicking INOH client icon.
Please invoke INOH client from shell of Terminal application by setting Java 6 properly. Or please use Mac OS X 10.6(Snow Leopard).
You may install the software according to the procedure directed on the page for downloading the INOH Client in the INOH Project's Website (http://www.inoh.org/).
The outlines of installing are shown below. You should refer to the above-mentioned Website for detailed operations.
For Windows, double-click “install.exe.”
For Unix-based OS, execute “cd” command to move to the directory including “inslall.bin", and then execute the following command.
sh./install.bin
For Mac OS X, double-click “install.zip”and double-click “install” which is expanded from “install.zip”.
Directories which the INOH Client uses are discussed below.
If you install the INOH Client to the INOH_CLIENT_HOME directory, the related directories under the INOH_CLIENT_HOME are configured as below.
- INOH_CLIENT_HOME/bin-sample
This directory includes samples of batch files and shell scripts which execute the INOH Client.
- INOH_CLIENT_HOME/doc
This is the directory for documents.
- INOH_CLIENT_HOME/lib
This directory is for various libraries which the INOH Client uses.
Before starting the INOH Client, you must install it correctly. In this section, the procedure is explained assuming that the INOH Client has been installed to the directory “INOH_CLIENT_HOME. ”
For Windows, execute “InohClient” from the Start menu with the same way as you start other applications, or execute “INOH_CLIENT_HOME\InohClient.exe.” “INOH_CLIENT_HOME” is usually “C:\Program Files\InohClient.”
For Unix-based OS, execute “runInohClient” in the HOME directory, or execute “INOH_CLIENT_HOME\InohClient.” “INOH_CLIENT_HOME” is usually “~/InohClient.”
For Mac OS X 10.5 or later and Java 6, double click the“InohClient”icon.
If the program will not start, re-installation may be required.
If you have downloaded the program without Java VM, ensure that the Java has been correctly installed, or try to download the program with Java VM.
To exit the INOH Client, execute “Exit” from the File menu.
The INOH Client has the following start-up options.
Note:
You can't specify these options with the executable command which was installed by installer. The executable command is 'InohClient.exe' in Windows, 'runInohClient' in Unix-based OSes.
If you want to use these options, please rewrite bacth files or script files in INOH_CLIENT_HOME/bin-sample directory.
Start-up options are described below.
It is assumed that the directory to which the INOH Client is installed is “INOH_CLIENT_HOME” again.
- -?
Shows simple usages.
- -andor <true or false>
Specifies AND/OR search of keyword search.
You can specify 'true' or 'false'.
This is valid only when -keyword is specified.
The default value is true which means AND search.
- -attrcheck <the full pathname of the attribute check definition file>
-
Specifies the attrbute check definition file with the full pathname.
Example for Windows:
-attrcheck c:\inoh\client\conf\attr-check-def.xml
- -author <the name of author>
Specifies the default value of author field of object.
- -authorMailAdd <the mail address of author>
Specifies the default value of author mail address field of object.
- -defobj <the full pathname of the object definition file>
-
Specifies the object definition file with the full pathname.
Example for Windows:
-defobj c:\inoh\client\conf\def-object.xml
- -depth <the depth of retrieval>
-
Specifies the value of positive integer for the depth of pathway related retrieval.
Example
-depth 2
The default value is 0.
- -extlink <the full pathname of the external link definition file>
-
Specifies the external link definition file with the full pathname.
Example for Windows:
-extlink c:\inoh\client\conf\ext-link-def.xml
- -help
Shows simple usages.
- -id <ID>
Specifies ID of ID search.
- -ignorecase <true or false>
Specifies ignorecase of keyword search.
You can specify 'true' or 'false'.
This is valid only when -keyword is specified.
The default value is true which means to ignore case.
- -keyword <keyword>
Specifies keyword of keyword search.
- -layouter <the full class name of the layouter>
-
This option determines the layouter which performs auto-layout. Specifies the full class name of the layouter class.
Please add the path of layouter's jar to your -cp or CLASSPATH.
Example
-layouter org.inoh.layout.InohLayouter
The default value
org.inoh.layout.InohLayouter
- -layoutoption <the full class name of the layout option handler>
This option determines the layout option handler which sets the option of auto-layout. Specifies the full class name of the layout option handle class.
Please add the path of layoutOptionHandle's jar to your -cp or CLASSPATH.
Example
-layoutoption org.inoh.layout.InohLayoutOptionHandler
The default value
org.inoh.layout.InohLayoutOptionHandler
- -manbase <the URI of the manual files>
Specifies the base URI of manual files.
- -match <method>
Specifies a match method of keyword search.
The valid values are 'x', 'c', 's' and 'e'.
'x' means "exact".
'c' means "contains".
's' means "starts with".
'e' means "ends with".
This is valid only when -keyword is specified.
The default value is 'c' which means "contains".
- -organismList <the full pathname of the organism list file>
-
Specifies the organism list file with the full pathname.
Example for Windows:
-organismList c:\inoh\client\conf\OrganismList.txt
- -protege
Specifies to work as a plugin of the Protege.
- -server <the URI of the INOH Server>
Specifies the URI of the INOH Server.
Example
-server http://localhost:8080/axis/services/InohWebService
The default value
http://www.inoh.org:8083/axis/services/InohWebService
- -svg <the full pathname of the SVG directory>
-
Specifies the full pathname of the SVG directory which includes the SVG file.
Example for Windows:
-svg c:\inoh\client\svg
In the bin-sample diretory, there are sample batch files and shell scripts to run INOH client.
inoh-jdk1_6.bat	batch file for Java 6(JDK1.6)
inoh-jdk1_6.sh	shell script for Java 6(JDK1.6)
inoh.bat	same as inoh-jdk1_6.bat
inoh.sh		same as inoh-jdk1_6.sh
mac-os-x-inoh.sh	shell script fo Mac OS X Java6(JDK1.6)
By rewriting these samples, you can customize INOH client according to your enviroment.
To execute samples, please use command prompt screen in Windows, or console screen in Unix-based OSes.
You also need to setup JAVA_HOME, INOH_CLIENT_HOME environment variables. Please specify install directory of Java to JAVA_HOME. Please specify install directory of INOH client to INOH_CLIENT_HOME.
For more detail, please consult your administrator.
In the case of memory shortage, e.g. when you load a huge diagram, please enlarge heap memory. Of course, there must be enough physical memory.
For example, if you want to set minimum heap size to 512MB, maximum heap size to 1024MB, you should change command line option -Xms, -Xmx to
-Xms512m -Xmx1024m
Before change(part of inoh.bat)
%JRE_HOME%\bin\java -Xms256m -Xmx512m ...(snip)
After change(part of inoh.bat)
%JRE_HOME%\bin\java -Xms512m -Xmx1024m ...(snip)
When you must use proxy server to search against INOH server, please set proxy properties in the command-line options of Java.
About networking properties of Java, pelase refer
http://java.sun.com/javase/6/docs/technotes/guides/net/properties.html
Networking Properties
To set http proxy server, you can use
http.proxyHost
http.proxyPort
http.nonProxyHosts
For example, when foo.com is proxy host and 8080 is proxy port number, please add
-Dhttp.proxyHost="foo.com" -Dhttp.proxyPort="8080"
to your command line.
Before change(part of inoh.bat)
%JRE_HOME%\bin\java -Xms256m -Xmx512m ...(snip)
After change(part of inoh.bat)
%JRE_HOME%\bin\java -Dhttp.proxyHost="foo.com" -Dhttp.proxyPort="8080" -Xms256m -Xmx512m ...(snip)
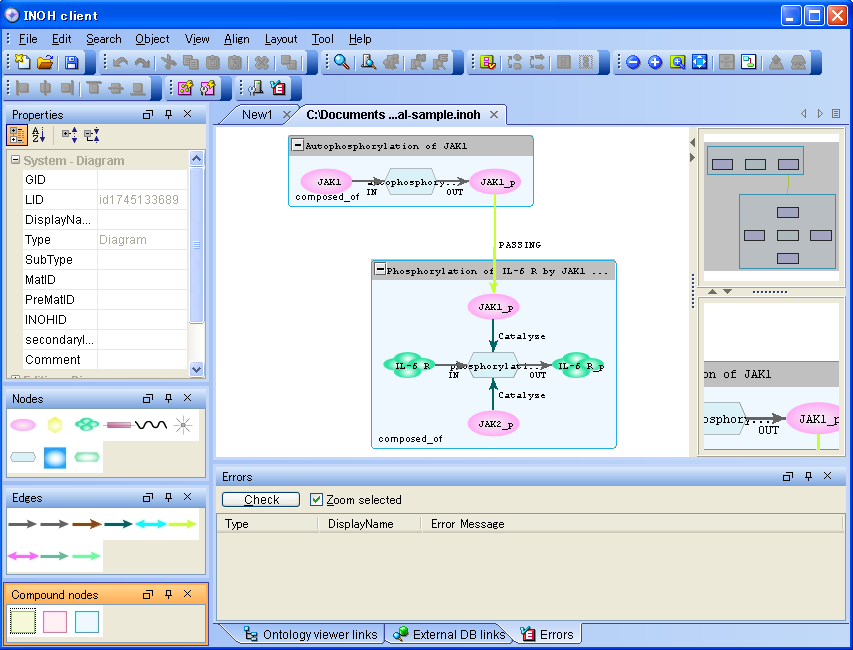
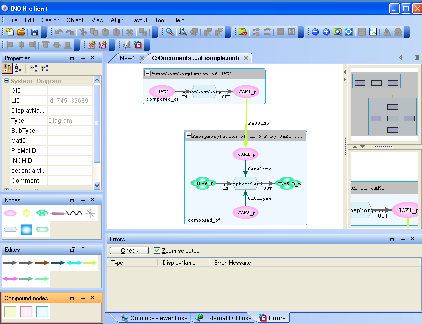
The screen of the INOH Client is shown below.
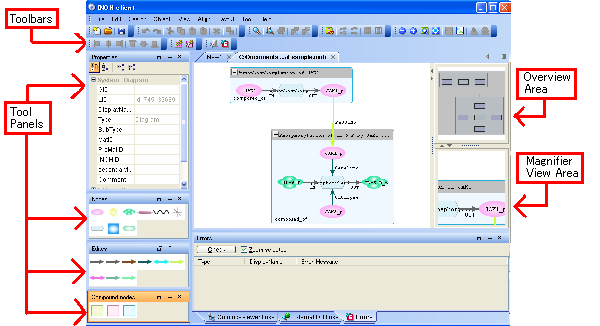
The screen configuration of the INOH Client
The screen mainly consists of the following areas.
- Toolbars
- Tool Panels
- Other Panels
- Diagram Editing Area
- Overview Area
- Magnifier View Area
Toolbars are placed above the Diagram Editing Area, including buttons used to edit diagrams.
Tool Panels are placed on the left side of the screen, including panels of the Properties, the Nodes, the Edges, and the Compound nodes.
Other Panels are placed on the bottom side of the screen, including panels of the Ontology viewer links, the External DB links, and the Errors.
The Diagram Editing Area is placed on the right side of the screen. The diagram you are currently editing is displayed in this area. You can edit the diagram with a mouse.
The Overview Area is placed on the top right side of the screen. Overview of the diagram you are currently editing is displayed in this area.
The Magnifier View Area is placed on the bottom right side of the screen. Magnified view of the diagram you are currently editing is displayed in this area.
In the following descriptions, the objects represent the nodes, the compound nodes, or the edges.
Toolbars include the particular buttons of the menus, which will be frequently used for diagram editing.
On the File Toolbar, functions related to files are arranged.

The File Toolbar
For the detail description of each function, refer to the The File menu.
On the Edit Toolbar, functions related to basic editing are arranged.

The Edit Toolbar
For the detail description of each function, refer to the The Edit menu.
On the Search Toolbar, functions related to searching are arranged.

The Search Toolbar
For the detail description of each function, refer to the The Search menu.
On the Object Toolbar, functions related to handling objects are arranged.

The Object Toolbar
For the detail description of each function, refer to the The Object menu.
On the View Toolbar, functions related to views are arranged.

The View Toolbar
For the detail description of each function, refer to the The View menu.
On the Align Toolbar, functions which align the layouts of objects are arranged.

The Align Toolbar
For the detail description of each function, refer to the The Align menu.
On the Layout Toolbar, functions for automatically laying out the screen are arranged.

The Layout Toolbar
For the detail description of each function, refer to the The Layout menu.
On the Tool Toolbar, functions for various settings are arranged.

The Tool Toolbar
For the detail description of each function, refer to the The Tool menu.
Each Toolbar can be set in a floating or docking state by dragging the left edge of the Toolbar with the left mouse button (move the mouse to the desired location, keeping the left mouse button pressed down). This operation enables you to set the Toolbar in your preferable state.
When several times of these operations disorder the screen, you may recover the original screen state by executing the "Reset docking state" from the Panel in the View Menu.
The Panels of Properties, Nodes, Edges, Compound nodes are included.
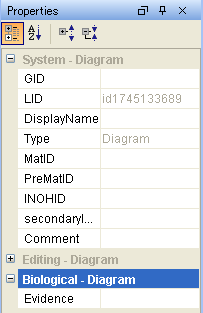
The Properties Panel
On the Properties Panel, the properties of selected objects are displayed. If no object is selected or multiple objects are selected, the property of the diagram is displayed.
You can edit the value of each property by clicking on the displayed value of the appropriate property
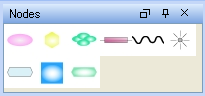
Nodes Panel
On the Nodes Panel, all kinds of nodes are arranged. When you create nodes, you can select the desired one in the panel.
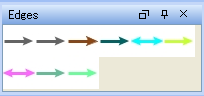
Edges Panel
On the Edges Panel, all kinds of edges are arranged. When you create edges, you can select the desired one in the panel.
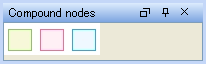
Compound nodes Panel
On the Compound nodes Panel, all kinds of compound nodes are arranged. When you create compound nodes, you can select the desired one in the panel.
Each panel can be resized, or be set in a floating or docking state by dragging the title area of the panel with the left mouse button (move the mouse to the desired location, keeping the left mouse button pressed down). This operation enables you to set the panel in your preferable state.
When several times of these operations disorder the screen, you may recover the original screen state by executing the "Reset docking state" from the Panel in the View Menu.
The Panels of Ontology viewer links, External DB links, Errors are included.
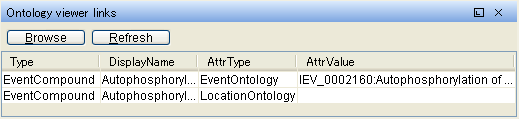
The Ontology viewer links Panel
On the Ontology viewer links Panel, the property values of selected objects, which can be used for INOH Ontology viewer are displayed.
By pushing the “Browse” button, you can invoke browser and search by INOH Ontology viewer with the selected property value.
By pushing the “Refresh” button, you can refresh the property values. You use this after editing property values of objects.

External DB links Panel
On the External DB links Panel, the property values of selected objects, which can be used for external DBs are displayed.
By pushing the “Browse” button, you can invoke browser and search the external DBs with the selected property value.
By pushing the “Refresh” button, you can refresh the property values. You use this after editing property values of objects.
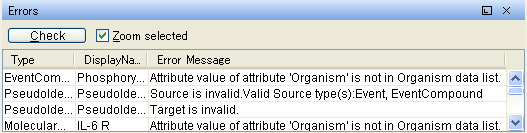
Errors Panel
On the Errors Panel, the errors are displayed after error checking.
By pushing the “Check” button, you can check errors.
Check the “Zoom selected”, to zoom the corresponding object when you select the displayed error.
Each panel can be resized, or be set in a floating or docking state by dragging the title area of the panel with the left mouse button (move the mouse to the desired location, keeping the left mouse button pressed down). This operation enables you to set the panel in your preferable state.
When several times of these operations disorder the screen, you may recover the original screen state by executing the "Reset docking state" from the Panel in the View Menu.
The Overview Area and the Magnifier View Area exist on the right side of the Diagram Editing Area.
The Overview Area is placed on the top right side of the screen. Overview of the diagram you are currently editing is displayed in this area. By dragging the gray rectangle, you can change the area which is diplayed in the Diagram Editing Area.
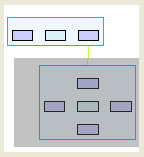
The Overview Area
The Magnifier View Area is placed on the bottom right side of the screen. Magnified view of the diagram you are currently editing is displayed in this area. The objects around the mouse cursor are displayed.
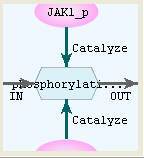
The Magnifier View Area
You can view the diagram in the Normal View Mode and the Reduced View Mode.
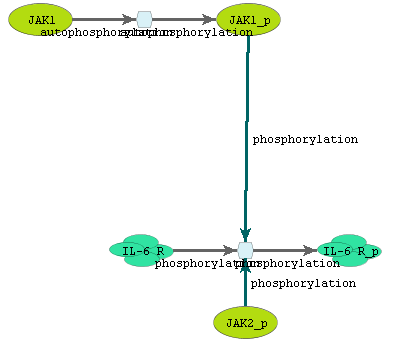
In the Normal View Mode, all objects are displayed.
In the Normal View Mode, you can use all editing functions.
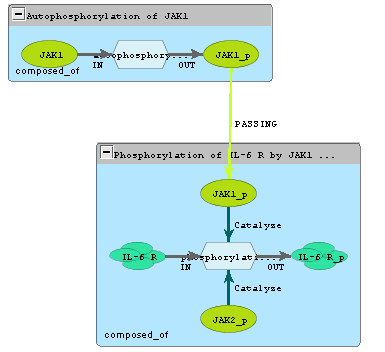
The Normal View Mode
In the Reduced View Mode, some kind of nodes and edges are omitted.
In the Reduced View Mode, you can not use almost all editing functions.
The Reduced View Mode
In the Diagram Editing Area, you can edit diagrams with a mouse.
The Pop-up menu can be displayed with the click of the right mouse button(*). Functions available at that time will be displayed in the Pop-up menu. Detailed explanation of each function is shown below.
* On Mac OS X, mouse click with pressing Ctrl key.
You can select an object by left-clicking on it.
You can select multiple objects within a rectangular region at the same time. To specify the rectangular region, left-click on a location which has no objects, keeping the mouse button pressed down, move the mouse to where you want it to be, and then release the button.
To select multiple objects successively, keeping the Shift key pressed down, click on two or more objects one by one with the left mouse button.
Select the desired type of nodes from the Nodes Panel.
Then click on the screen with the left mouse button to create a node.
Select the desired type of edges from the Edges Panel.
Then click on a node with the left mouse button, keeping the mouse button pressed down, move the cursor onto another node and release the button on it to create the edge.
In the middle of creating an edge, we call it “edge mode”. To exit edge mode, press the ESC key on the keyboard.
Select the desired type of compound nodes from the Compound nodes Panel.
Then click on the screen with the left mouse button to create a compound node.
In the method 1, the procedure starts with previously selecting nodes which you want to be the child.
First, select the objects you want to be the child ones.
Next, select the desired type of the compound node from the Compound nodes Panel.
In the method 2, the procedure starts with previously selecting a compound node.
First, select the desired type of the compound node from the Compound nodes Panel.
Next, select the objects which you want to be the children.
Then right-click to display the Pop-up menu, and select "Group Selection" from the menu.
To move objects, select and move the objects, keeping the left mouse button pressed down.
To cut objects, select the objects and execute any operations listed below.
- Push the “Cut Selection” button on the Toolbar.
- Select “Cut” from the Edit menu.
- Press the X key on the keyboard, keeping the Ctrl key pressed down.
The processed objects disappears from the screen, and are copied into the Clipboard. You can paste them on the screen from the Clipboard.
To copy objects, select the objects and execute any operations listed below.
- Push the “Copy Selection” button on the Toolbar.
- Select “Copy” from the Edit menu.
- Press the C key on the keyboard, keeping the Ctrl key pressed down.
The processed objects are copied into the Clipboard. You can paste them on the screen from the Clipboard.
The template is a model for making new objects.
Pasting a object as a template and then editing the Biological attribute of it, you can upload to the server and register it as a new object.
To paste as a template, select the object and execute any operations listed below.
- Push the “Paste as template” button on the Toolbar.
- Select “Paste as template” from the Edit menu.
- Press the V key on the keyboard, keeping the Ctrl key pressed down.
The copied object in the Clipboard will be pasted as a template on the screen.
Pasting as an alias is to copy the existing object and paste it with the different name.
The pasted object as an alias is identified as the object identical to the original object at the server side.
Note:
The INOH Client assumes that the Biological attribute of the pasted object as an alias is not edited. If the attribute is edited, the object is registered as a new object when uploaded to the server.
To paste as an alias, select the object and execute any operations listed below.
To delete objects, select the objects and execute any operations listed below.
- Push the “Delete Selection” button on the Toolbar.
- Select “Delete Selection” from the Edit menu.
- Press the Delete key on the keyboard.
Unlike the cutting operation, this operation does not copy the objects into the Clipboard.
This method adds an new child object to the existing compound node.
First, select the compound node which you want to be the parent, and then click the icon at the upper left corner of the compound node to be opened. The icon with “+” indicates that it is opened, and the icon with “-” indicates that it is closed.
Next, select the desired type of the node as a new child from the Nodes Panel or the Compound nodes Panel.
Then click on the existing compound node with the left mouse button.
Although the screen may seem to have no changes, moving the compound node makes the child objects move together. So you can see that the compound node includes the child objects.
This method adds existing child objects to the existing compound node.
First, select the compound node which you want to be the parent, and then click the icon at the upper left corner of the compound node to be opened. The icon with “+” indicates that it is opened, and the icon with “-” indicates that it is closed.
Next, select the objects which you want to be the children.
Lastly move the selected object into the compound node keeping the Shift key pressed down to establish the parent-child connection.
Although the screen may seem to have no changes, moving the compound node makes the child objects move together. So you can see that the compound node includes the child objects.
This method removes the parent-child connection of only the selected child object.
First, select the child object in the compound node.
Next, move the selected object out of the parent compound node keeping the Shift key pressed down to remove the parent-child connection.
Although the screen may seem to have no changes, moving the compound node does not make the child objects move together. So you can see that the child objects have been disconnected from the compound node.
This method removes all the parent-child connection in a compound node.
First, select the compound node.
Next, click with the right mouse button to display the Pop-up menu, and then select "Ungroup Selection."
Although the screen may seem to have no changes, moving the compound node does not make the child objects move together. So you can see that the child objects have been disconnected from the compound node.
You can scroll screen vertically by wheel.
You can scroll screen vertically by wheel.
You can zooming screen by wheel keeping the Ctrl key pressed down.
This section describes major functions of the INOH Client by menu.
The File menu includes functions to open files, save files, and so on.
You can create a new diagram data using this function.
When the menu is selected, a new tab window appears and you can edit the file.
This function is used to read the existing diagram data into the INOH Client from the local files.
When the function is selected, a new tab window appears and you can edit the data.
If the file has already been opened, the window is switched to the tab window that displays that file.
This function is used to close the tab window you are currently editing.
If the diagram data is changed, you are prompted to confirm if you are storing the data.
This function stores the whole diagram data you are currently editing and overwrites the existing data with it.
This function is used to store the whole diagram data you are currently editing with a different name.
This function closes all the tab windows and terminates the INOH Client.
If the diagram data is changed, you are prompted to confirm if you are storing the data.
The Edit menu includes basic functions associated with editing.
This function cancels and reverses the most recent editing operation.
This function cancels the most recent Undo.
This function cuts the selected objects and copies them into the Clipboard. You may paste the cut objects by “Paste as template” or “Paste as alias” later.
If you select the compound nodes, all the objects included in them will be cut at the same time with them.
This function copies the selected objects into the Clipboard. You may paste the copied objects by “Paste as template” or “Paste as alias” later.
If you select the compound nodes, all the objects included in them will be copied at the same time with them.
This function pastes the cut or copied objects as a template.
For the detailed description about templates, refer to “Pasting as a template.”
This function pastes the cut or copied objects as an alias.
For the detailed description about alias, refer to “Pasting as an alias.”
This function deletes the selected objects. In contrast to “Cut” or “Copy”, the deleted objects are not copied to the Clipboard.
This function duplicates the selected object as a template. This is equal to the operation that executes “Copy “and “Paste as template” in the order.
This function selects all the objects.
The Search menu includes functions associated with searching.
This function is used to search for objects in the current diagram.
Explanations of the Find dialog box are shown below.
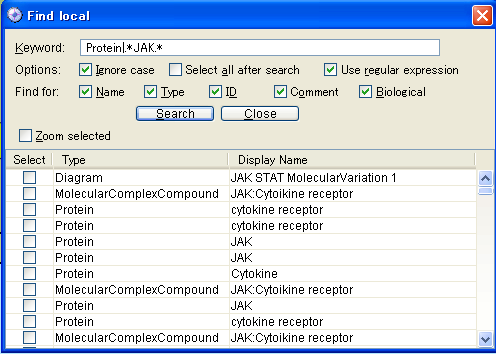
Find dialog
For the “Keyword”, specify the words you want to search for.
You can specify one or more words by separating each word with a space. The system will find objects that has all the terms ("AND" search).
By enclosing the keyword in double quotes (" "), you can specify the phrase including spaces as one word.
For example, when you enter < protein genome > without enclosing in double quotes, it will be recognized as two words, < protein > and < genome >. On the other hand, when you enter < "protein genome" > with double quotes, it will be recognized as one word, < protein genome >.
To include " (double quote) itself in your keystring, escape it by quoting it with ' (single quote).
For example, < 'find " itself' >.
Check this box to specify case-insensitive search.
Check this box to select all objects that you get.
Check this box to include DisplayName in the search space.
Check this box to include Type in the search space.
Check this to include ID in the search space.
Check this to include Comment in the search space.
Check this box to include Biological in the search space.
Check this box to zoom the corresponding object when you select the displayed object.
All found objects are listed up in the dialog.
Check the Select box to select any objects.
This function is used to search for data in the server by specifying keywords or ID.
Explanations of the Keyword/ID Search dialog box are shown below.
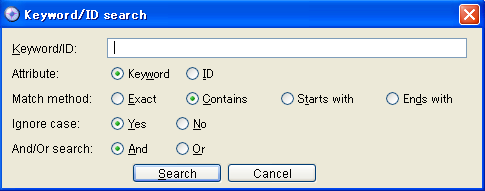
Keyword/ID search dialog
For the “Keyword”, specify the words or ID you want to search for.
- Keyword search
You can specify one or more words by separating each word with a space. The “And/Or search” option determines if the search is to be executed on all of them (the “AND” search) or any of them (the “OR” search).
Enclosing the keyword in double quotes (" "), you can specify the phrase including spaces as one word.
For example, when you enter < protein genome > without enclosing in double quotes, it will be recognized as two words, < protein > and < genome >. On the other hand, when you enter < "protein genome" > with double quotes, it will be recognized as one word, < protein genome >.
To include " (double quote) itself in your keystring, escape it by quoting it with ' (single quote).
For example, < 'find " itself' >.
- ID search
You can specify a ID.
The option “Exact” searches for data that corresponds with the keyword.
The option “Contains” searches for data that includes the keyword.
The option “Starts with” searches for data that begins with the keyword.
The option “Ends with” searches for data that ends with the keyword.
The option “Yes” specifies the case-insensitive search.
The option “No” specifies the case-sensitive search.
The option “And" specifies the search for data including all of the keywords.
The option “Or" specifies the search for data including any of the keywords.
This function is used to perform similarity search.
There are Molecule Role Ontology search and Event Ontology search.
This function performs Molecule Role Ontology search.
This function performs Event Ontology search.
This function executes the pathway retrieval.
This option searches for the “Previous curated/inferred.”
This option searches for the “Following curated/inferred.”
This option searches for the “Controller/Controlled.”
This option searches for the “Super/Sub.”
This option searches for the “Homologous.”
This option searches for the “MolecularVariation.”
This option searches for all the above.
The Object menu includes functions associated with the objects.
This function displays the dialog box for editing the properties of objects, in which you can edit them.
This function changes the type of selected node.
This function changes the type of selected edge.
This function creates the compound node which includes the selected objects as the children. You have to previously select the desired compound node in the Compound nodes Panel.
Although the screen may seem to have no changes, moving the compound node makes the child objects move together. So you can see that the compound node includes the child objects.
This function removes the parent-child connection between the child objects and the parent compound node so that the child objects can be got out of the compound node.
Although the screen may seem to have no changes, moving the compound node does not make the child objects move together. So you can see that the child objects have been disconnected from the compound node.
The View menu includes functions associated with displaying.
This function is used to scale up the diagram.
This function is used to scale down the diagram.
This function is used to scale up/down the diagram with a focus on the selected object.
This function is used to scale up/down the diagram so that all the objects can be displayed on the screen.
This function is used to view the diagram in the normal view mode.
This function is used to view the diagram in the reduced view mode.
This function is used to go to the parent graph when you edit the inner graph of the closed compound node.
This function is used to edit the inner graph of the closed compound node.
The function “Panel” includes options to switch the view of each panel.
This option switches the state in which the Properties Panel is displayed or not.
This option switches the state in which the Nodes Panel is displayed or not.
This option switches the state in which the Edges Panel is displayed or not.
This option switches the state in which the Compound nodes Panel is displayed or not.
This option switches the state in which the Ontology viewer links Panel is displayed or not.
This option switches the state in which the External DB links Panel is displayed or not.
This option switches the state in which the Errors Panel is displayed or not.
This option resets the states of the Panels and the Toolbars to its original states.
The Align menu includes functions to align arrangements of the objects.
In the following descriptions, the term “node” includes a compound node.
This function aligns two or more objects on the left.
The left end of each selected node is aligned to the left end of the node on your far left.
This function horizontally centers two or more objects.
The horizontal center of each selected node is aligned to the midpoint between the left end of the node on your far left and the right end of the node on your far right.
This function aligns two or more objects on the right.
The right end of each selected node is aligned to the right end of the node on your far right.
This function aligns two or more objects on the top.
The upper end of each selected node is aligned to the upper end of the node on the top.
This function vertically centers two or more objects.
The vertical center of each selected node is aligned to the midpoint between the upper end of the node on the top and the lower end of the node on the bottom.
This function aligns two or more objects on the bottom.
The lower end of each selected node is aligned to the lower end of the node on the bottom.
This function brings the selected objects to front.
The objects hidden by other objects will come to the front and appear.
This function brings the selected objects to back.
The objects in front of other objects will be sent to the back and hidden.
This function executes the auto-layout operation.
This function makes the optional setting of the auto-layout.
This function is used to make each setting.
There are two tabs called“General”and“Similarity seach”.
Explanations of the General tab are shown below.
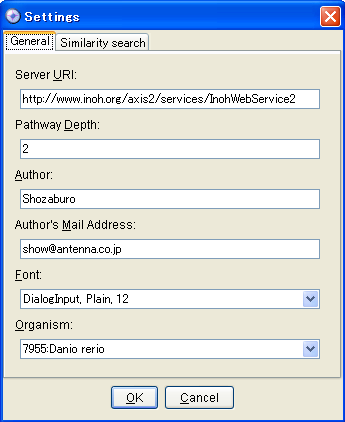
General settings tab
For the “Server URI”, specify the URI of INOH server.
For the “Pathway Depth”, specify the search depth of Pathway retrieval.
For the “Author”, specify the author of diagram.
For the “Author's Mail Address”, specify the author's mail address.
For the “Font”, specify the default font.
For the “Organism”, specify the default value of Organism property.
Explanations of the Similarity search settings are shown below.
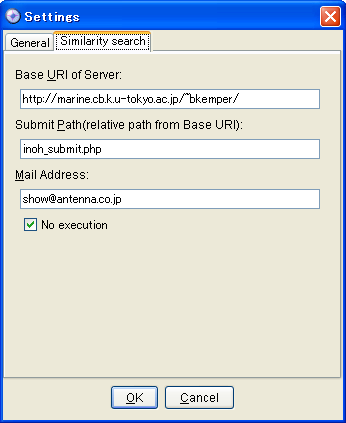
Similarity search settings tab
For the “Base URI of Server”, specify the Base URI of similarity search server.
For the “Submit Path”, specify the submit path of similarity search server.
For the “Mail address”, specify the mail address.
If you don't want to perform search and only want to set parameters, Check this box.
This function is used to check errors in a diagram.
This function shows the japanese user's manual.
This function shows the english user's manual.
This function displays the information about the INOH Client such as the version information.